As I lifted the lid off the mixing bowl, the rich scent of chocolate enveloped my kitchen, instantly transporting me to a childhood filled with warm family gatherings and laughter. This Reese’s Peanut Butter Earthquake Cake is not just dessert; it’s a heartfelt nod to those cozy, sweet memories. With its quick prep time and the delightful combination of creamy peanut butter and indulgent chocolate, this recipe is perfect for anyone looking to elevate their baking game without spending hours in the kitchen. It’s a crowd-pleaser that will have friends and family coming back for seconds—or maybe even thirds! Are you ready to discover how simple it is to create this unforgettable treat? Let’s dive in!
Why is This Cake So Irresistible?
Decadent Layers: The luscious layers of chocolate cake and creamy peanut butter filling create a mind-blowing treat that nobody can resist.
Quick and Easy: Prep in just 15 minutes! This cake is perfect for busy bakers who want a homemade dessert without the fuss.
Crowd Favorite: Delight your friends and family with this show-stopping creation that’s sure to be the highlight of any gathering.
Versatile Options: Want to mix it up? This recipe can easily be adapted for gluten-free diets or even personalized with different types of candy.
Rich Flavor Profile: The combination of chocolate, peanut butter, and cream cheese delivers an explosion of flavor that will leave everyone craving more!
Reese’s Peanut Butter Earthquake Cake Ingredients
Unleash the delicious magic with these essential ingredients!
For the Cake
- Chocolate cake mix – the foundation of our decadent delight; choose your favorite brand for the best results.
- Water – helps create the perfect batter consistency; feel free to replace with milk for extra richness.
- Vegetable oil – keeps the cake moist and tender; can be substituted with melted coconut oil for a unique twist.
- Large eggs – binds everything together and adds richness; using room temperature eggs helps create a fluffy texture.
For the Peanut Butter Filling
- Creamy peanut butter – the star of the show; use natural peanut butter for a healthier option without added sugars.
- Cream cheese – lends a creamy, tangy contrast to the sweetness; ensure it's softened for easy mixing.
- Melted butter – enriches the filling and aids in a smooth consistency; a bit of additional peanut butter can be added for flavor.
- Powdered sugar – sweetens the filling and thickens it; sift it to avoid lumps for a silky texture.
- Vanilla extract – elevates the flavors beautifully; substitute with almond extract for a different aroma.
For the Topping
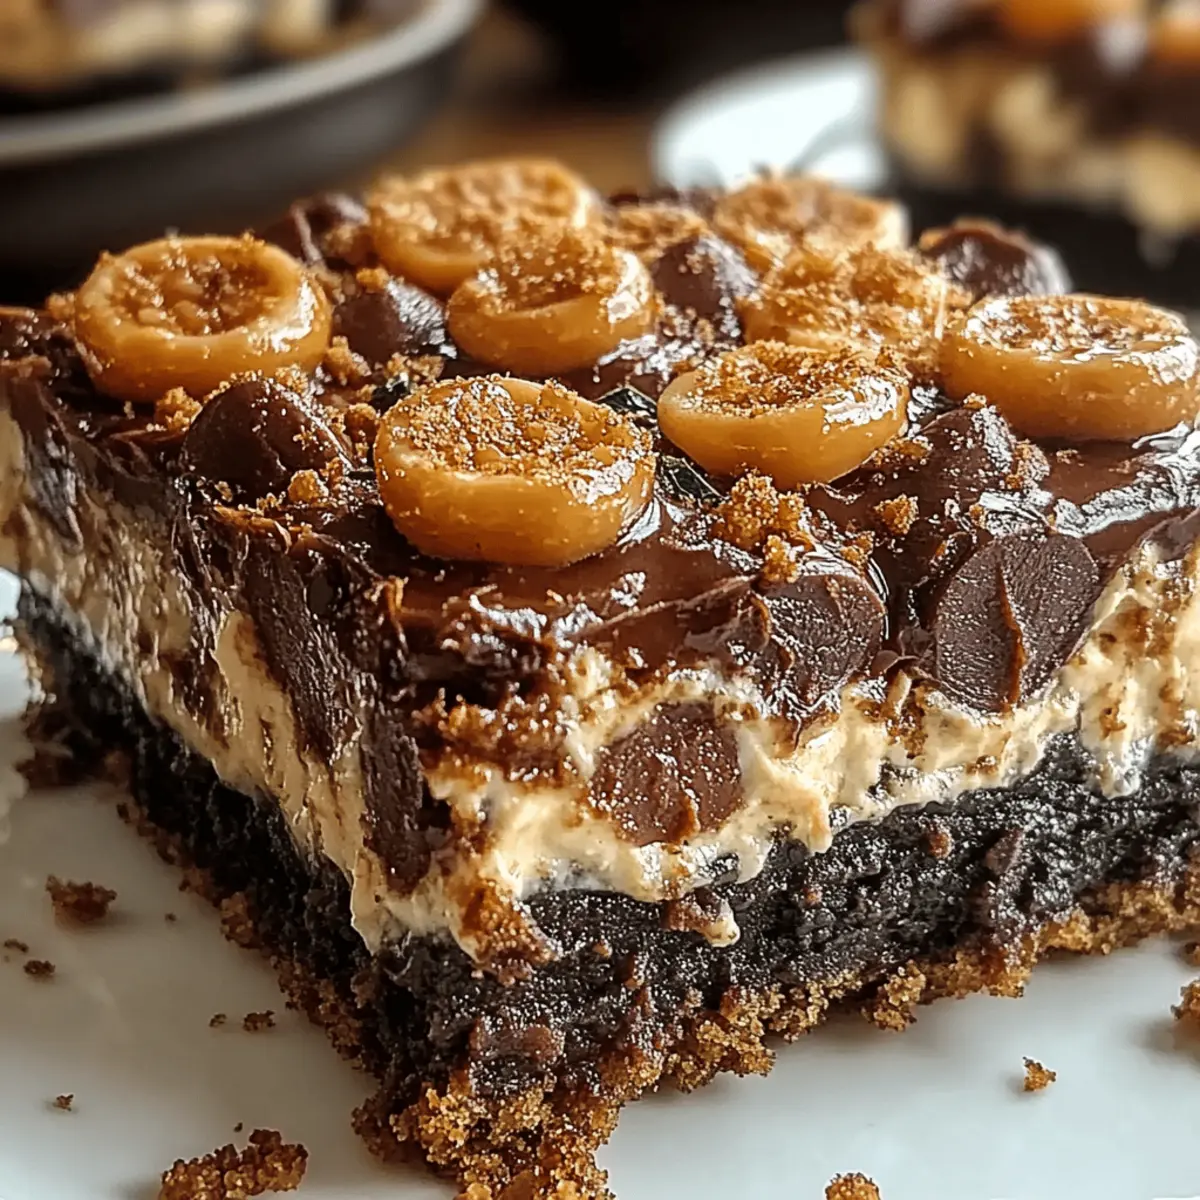
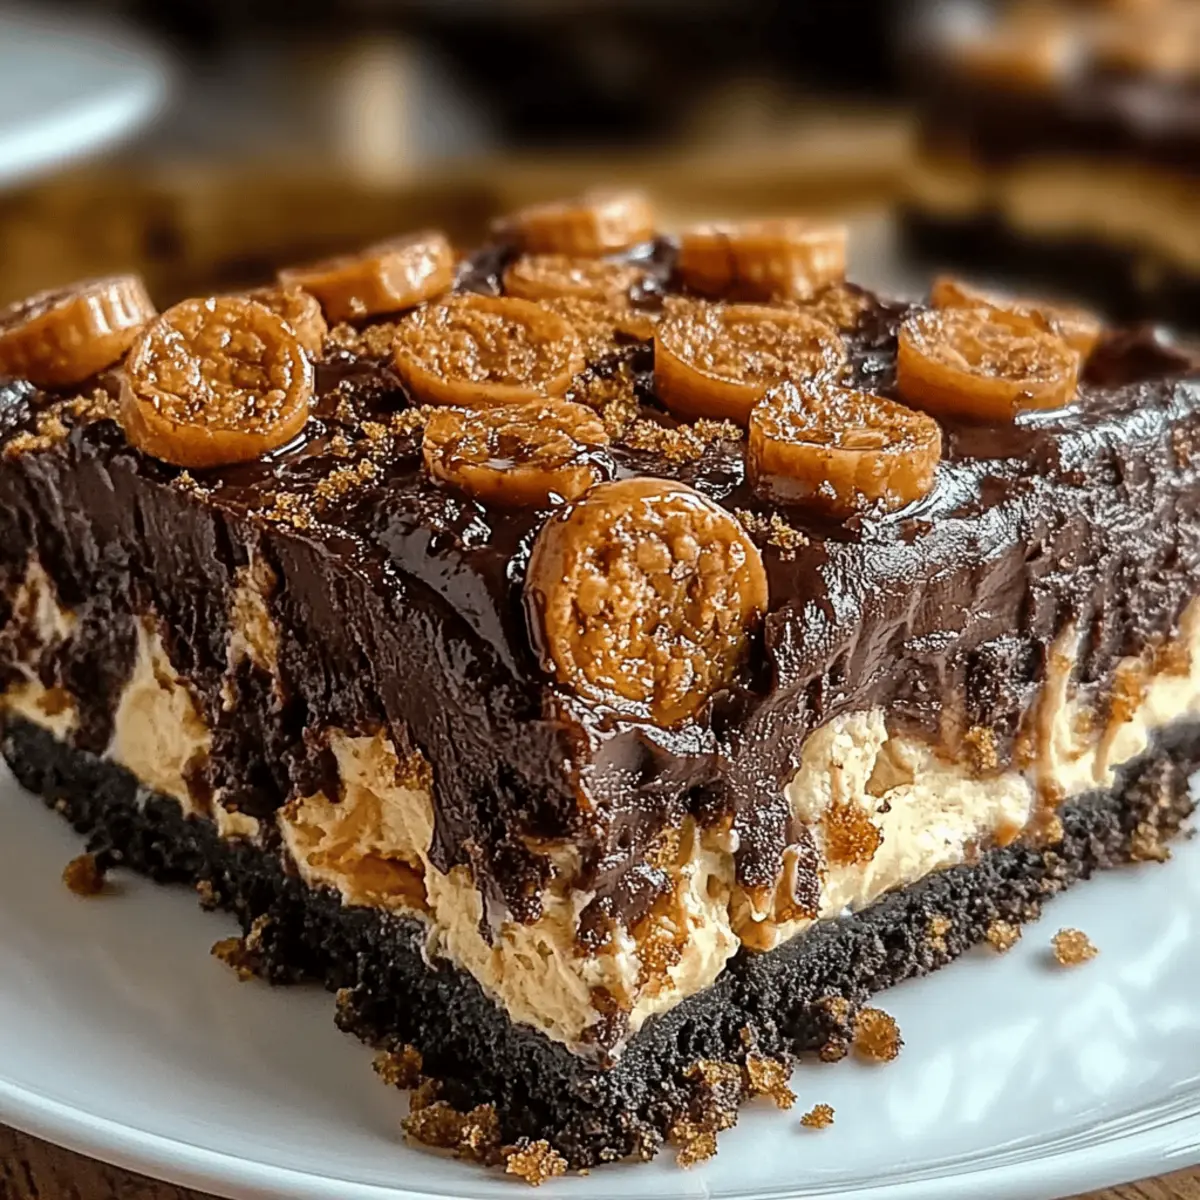
- Chopped Reese’s Peanut Butter Cups – for that undeniable chocolate-peanut butter goodness; chop them just before adding to retain their shape.
Each bite of this Reese’s Peanut Butter Earthquake Cake will create sweet memories worth savoring!
Step‑by‑Step Instructions for Reese’s Peanut Butter Earthquake Cake
Step 1: Preheat and Prepare
Start by preheating your oven to 350°F (175°C). While it heats, grab a 9x13-inch baking dish and generously grease it with cooking spray or a bit of butter. This prevents sticking and ensures your beautiful Reese’s Peanut Butter Earthquake Cake comes out perfectly shaped and intact.
Step 2: Mix the Chocolate Batter
In a large mixing bowl, combine the chocolate cake mix, 1 cup of water, ½ cup of vegetable oil, and 3 large eggs. Using a whisk, mix everything together until you achieve a smooth, lump-free batter. Aim for a velvety texture, which should only take a minute or two.
Step 3: Pour and Spread the Batter
Pour the chocolate batter into your prepared baking dish. Use a spatula to spread it evenly across the bottom, making sure it's level for uniform baking. You’ll see the luscious chocolatey goodness glistening, waiting for its delicious toppings.
Step 4: Create the Peanut Butter Filling
In a separate bowl, mix together 1 cup of creamy peanut butter, 8 oz of softened cream cheese, ½ cup of melted butter, 4 cups of powdered sugar, and 1 teaspoon of vanilla extract. Blend until the mixture is smooth and creamy, resembling a thick frosting that’s ready to elevate your cake.
Step 5: Dollop and Swirl
Drop spoonfuls of the peanut butter mixture over the chocolate batter in the pan. Then, take a butter knife and gently swirl the peanut butter mixture into the chocolate batter, creating a marbled effect. Be careful not to overmix; you want to see beautiful chunks of peanut butter shining through.
Step 6: Add the Topping
Sprinkle the chopped Reese’s Peanut Butter Cups evenly over the top of the batter, making sure to distribute them for that irresistible chocolate-peanut butter flavor in every bite. The sight of those chunks will surely get everyone excited for your Reese’s Peanut Butter Earthquake Cake!
Step 7: Bake to Perfection
Place the baking dish in your preheated oven and bake for 35 to 40 minutes. Keep an eye on the cake; it’s done when a toothpick inserted into the center comes out mostly clean, with a few crumbs attached. A slight jiggle in the center indicates it’s just right!
Step 8: Cool Before Serving
Once baked, carefully remove the cake from the oven and allow it to cool slightly in the dish. Let it rest for about 15-20 minutes. This helps the layers set perfectly and makes for easier slicing when you’re ready to share this delightful Reese’s Peanut Butter Earthquake Cake with family and friends.
What to Serve with Reese’s Peanut Butter Earthquake Cake
Imagine a cozy gathering where everyone is indulging in this luscious cake, surrounded by dishes that enhance its rich flavors and make for a perfect meal.
-
Vanilla Ice Cream: The creamy, cold texture of vanilla ice cream balances the warm, rich cake beautifully, creating a delightful contrast in temperatures.
-
Chocolate Drizzle: A warm, decadent chocolate drizzle takes this cake over the top, adding extra sweetness and making each slice even more irresistible.
-
Fresh Berries: Bright, juicy raspberries or strawberries add a fresh, tangy note to the rich cake, cutting through the sweetness for a well-rounded dessert experience.
-
Whipped Cream: Light and airy whipped cream complements the dense layers of cake while providing a delightful creaminess to each forkful. Top it with a sprinkle of cocoa for added flair!
-
Peanut Butter Mousse: For the ultimate peanut butter lover's feast, serve a fluffy peanut butter mousse alongside. It echoes the flavors in the cake while adding an extra creamy layer of delight.
-
Coffee or Espresso: A warm cup of coffee or a shot of espresso enhances the chocolate flavor and provides a lovely counterpart to the sweetness of the cake. The bitterness of coffee makes every bite even more delicious!
-
Chocolate Milkshake: For the kids—or the kid at heart—a chocolate milkshake echoes the cake's flavors while bringing an element of fun. It's a delightful, indulgent treat to pair with your dessert!
-
Salted Caramel Sauce: Drizzling a bit of warm salted caramel sauce over the cake brings an irresistible contrast of sweetness and salt that elevates the entire dessert experience into the realm of divine.
-
Nutty Granola: Crumbling some nutty granola on top brings in crunch and wholesome flavors, contrasting beautifully with the cake's softness while adding a layer of texture.
Make Ahead Options
These Reese’s Peanut Butter Earthquake Cake preparations are perfect for meal prep enthusiasts! You can mix the chocolate batter and peanut butter filling up to 24 hours in advance, storing them separately in airtight containers in the refrigerator. To prevent the peanut butter filling from hardening, ensure it's well covered. When you’re ready to bake, simply pour the chocolate batter into the greased dish, add the dollops of peanut butter filling, swirl gently, top with the chopped Reese’s Peanut Butter Cups, and bake as directed. This makes your baking swift and hassle-free while ensuring the cake tastes just as delicious on serving day!
Expert Tips for Reese’s Peanut Butter Earthquake Cake
-
Use Room Temperature Ingredients: Ensure your eggs and cream cheese are at room temperature for easy mixing and a smoother batter.
-
Don’t Overmix: Mixing the batter too much can lead to a dense cake. Whisk just until combined for that perfect fluffiness.
-
Check Doneness Carefully: Insert a toothpick in the center; it should come out mostly clean with a few crumbs, but not wet batter to ensure a moist cake.
-
Swirl Gently: When dolloping the peanut butter mixture, swirl it through the chocolate batter lightly to create beautiful marbling without mixing thoroughly.
-
Store Properly: Keep leftovers in an airtight container at room temperature for up to three days to preserve freshness and flavor of your Reese’s Peanut Butter Earthquake Cake.
-
Experiment with Toppings: Feel free to add different candies or nuts on top for a fun twist, but ensure they’re evenly distributed for balanced flavor in every slice!
Storage Tips for Reese’s Peanut Butter Earthquake Cake
Room Temperature: Store the cake in an airtight container at room temperature for up to 3 days. This keeps it moist and delicious for all your sweet cravings!
Fridge: If you prefer a cooler treat, you can refrigerate the cake. Just be sure to keep it covered to prevent it from drying out or absorbing other odors, and consume within a week.
Freezer: Wrap the cake tightly in plastic wrap and then in aluminum foil before freezing. It will maintain its flavor and texture for up to three months, making it perfect for those unexpected cravings!
Reheating: To enjoy a warm slice, simply thaw it in the fridge overnight and reheat in the microwave for 10–15 seconds. Indulge in the delightful flavors of this Reese’s Peanut Butter Earthquake Cake!
Reese’s Peanut Butter Earthquake Cake Variations
Feel free to get creative with this cake and make it your own!
-
Gluten-Free: Use a gluten-free chocolate cake mix to accommodate dietary needs without sacrificing taste.
When your sister-in-law visits, she'll be thrilled to enjoy a slice without worry. It’s a small change with big flavor results! -
Nut-Free: Swap peanut butter for sun butter or almond butter to create a nut-free option that everyone can enjoy.
Think of sweet moments shared without the worry. It transforms the cake into a safe and delicious treat for kids' birthdays too! -
Extra Chocolatey: Add mini chocolate chips to the chocolate batter for a double dose of chocolate goodness.
Imagine those melty pockets of chocolate bursting in your mouth with every bite—it's pure joy! -
Spicy Kick: Incorporate a pinch of cayenne pepper into the chocolate batter for a surprising hint of heat.
The contrast of hot and sweet will have your taste buds dancing, leaving everyone guessing the secret ingredient! -
Reduced Sugar: Cut the powdered sugar in the peanut butter filling by half for a less sweet but just as delightful treat.
Enjoy a lighter version that still satisfies those chocolate cravings while keeping indulgence in check. -
Fruit Twist: Add a layer of sliced bananas or strawberries in between the chocolate and peanut butter layers for a fruity surprise.
The fresh fruit adds a burst of flavor that complements the rich ingredients beautifully. -
Cheesecake Variation: Blend an extra egg into the cream cheese filling to turn it into a cheesecake experience.
The creaminess takes this cake to another level, creating a luscious, indulgent twist that's perfect for special occasions! -
Different Candy Toppings: Experiment with your favorite candy, like Snickers or M&M's, to give a fun twist to the topping.
Each bite will be a new adventure in flavor—perfect for those sweet-toothed family members craving variety!

Reese’s Peanut Butter Earthquake Cake Recipe FAQs
How do I choose ripe and fresh ingredients for the cake?
Absolutely! When selecting your ingredients, make sure to check the chocolate cake mix's expiration date for freshness. Choose creamy peanut butter that’s smooth and free from dark spots. Opt for large eggs that are clean and uncracked, and make sure your cream cheese is at room temperature for the best blending.
What is the best way to store leftovers of this cake?
Store your Reese’s Peanut Butter Earthquake Cake in an airtight container at room temperature for up to 3 days. If you have any leftovers, it can also be kept in the fridge for about a week—just be sure it stays covered to keep its moisture intact.
Can I freeze the Reese’s Peanut Butter Earthquake Cake?
Certainly! To freeze your cake, wrap it tightly in plastic wrap, followed by aluminum foil, and place it in the freezer. This method keeps it fresh for up to 3 months. When you’re ready to enjoy, simply thaw it in the refrigerator overnight before serving.
What should I do if my cake is too dense?
If your cake turns out dense, it may be due to overmixing the batter. Next time, blend your ingredients just until combined for a fluffier texture. Additionally, ensure your baking powder is fresh, as expired leavening agents can affect rise and texture.
Is this cake suitable for those with dietary restrictions?
Very! This Reese’s Peanut Butter Earthquake Cake is vegetarian, and you can easily make it gluten-free by using a gluten-free chocolate cake mix. Be sure to check the labels on your ingredients for possible allergens, especially the peanut butter.
Can I use a different type of candy on top?
Definitely! The joy of this cake is its versatility. You can swap out Reese’s Peanut Butter Cups for other candies like chopped Snickers, M&M's, or even nuts for a delightful crunch. Just be mindful to distribute them evenly for consistent flavor in every slice.
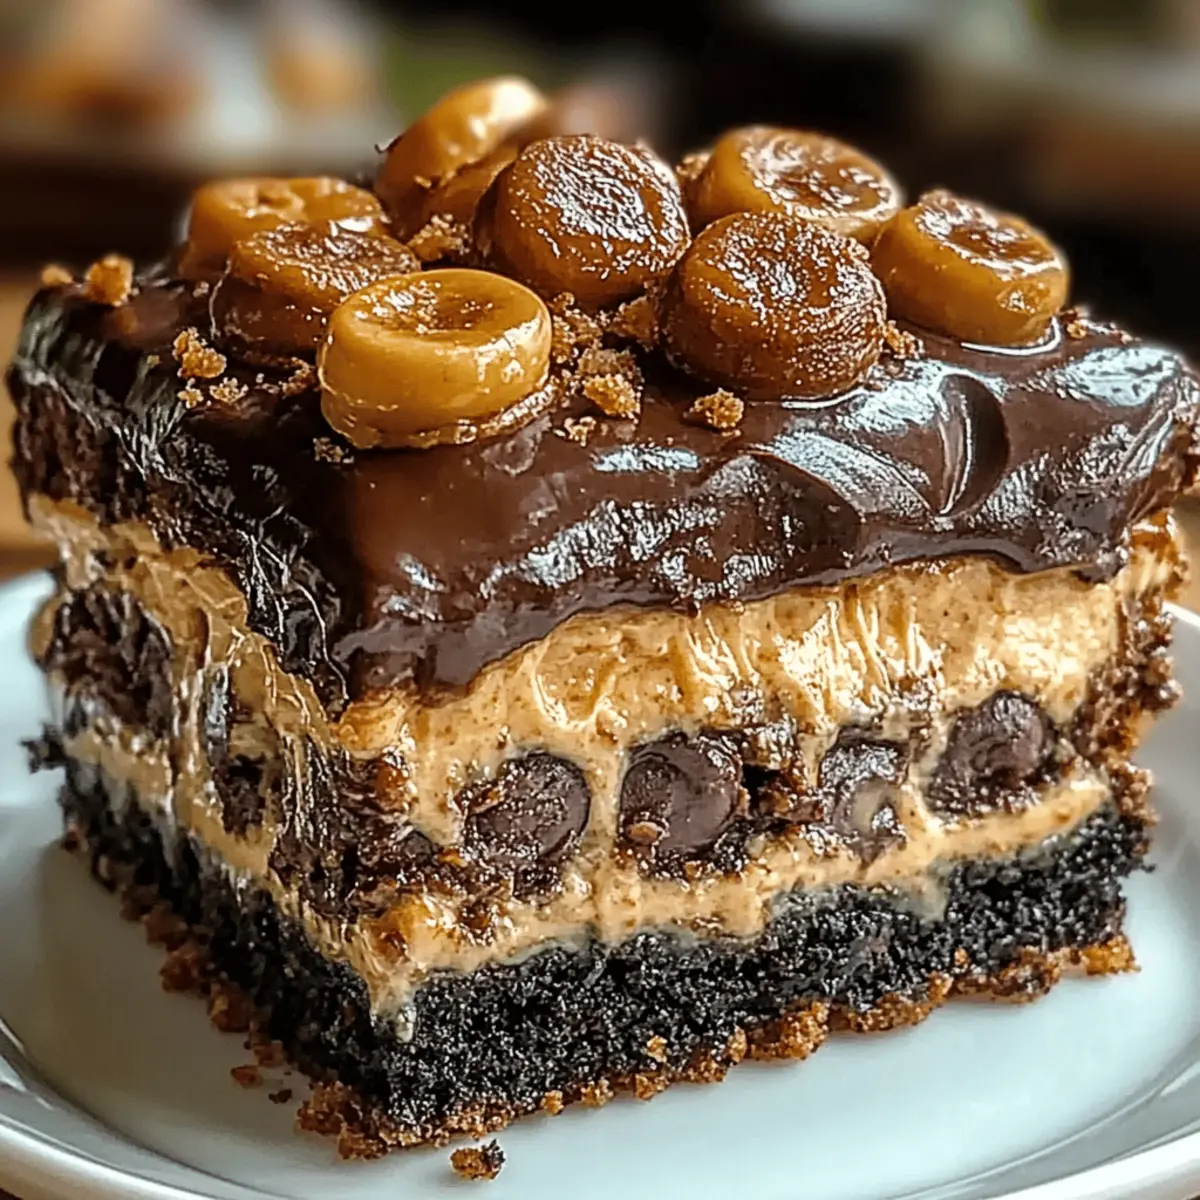
Irresistible Reese’s Peanut Butter Earthquake Cake Delight
Ingredients
Equipment
Method
- Preheat your oven to 350°F (175°C) and grease a 9x13-inch baking dish.
- In a large bowl, combine the chocolate cake mix, 1 cup of water, ½ cup of vegetable oil, and 3 eggs. Mix until smooth.
- Pour the batter into the prepared baking dish and spread evenly.
- In a separate bowl, mix together 1 cup of peanut butter, 8 oz of cream cheese, ½ cup of melted butter, 4 cups of powdered sugar, and 1 teaspoon of vanilla extract until creamy.
- Dollop the peanut butter mixture over the chocolate batter and swirl gently with a butter knife.
- Sprinkle chopped Reese’s Peanut Butter Cups over the top.
- Bake in the preheated oven for 35 to 40 minutes. Check doneness with a toothpick.
- Allow the cake to cool in the dish for 15-20 minutes before serving.